Git Basics
 This blog post is a beginners' guide (written by a git beginner) on how to perform basic version control operations with git including initializing a repository, adding files to it, and using branches.
The goal of this post is to describe how to use git in your local machine for version control. In a future post I'll cover the basics of using git and github for collaboration with other developers.
Everything that I show on this blog is done through git's command line via the Mac OS X terminal. The steps should be very similar in other operating systems but I have not tested them outside of the Mac.
Is Git Installed on my Mac?
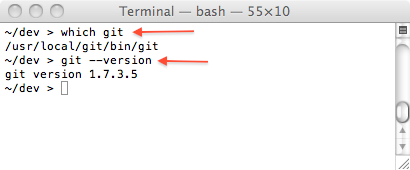
We can issue the following commands from the terminal to find out if git is installed and what version we have installed:
which git
git --version
The command which git tells us if git is in our path and should return something like "/usr/local/git/bin/git". If it returns nothing it means that git is not in our path and probably not installed in our machine.
If git is installed, we can issue git --version to figure out what version we are using. The following screenshot shows what I got on my machine:
If git is not installed on your Mac you can use the pre-compiled installer to install it on your computer.
Creating a Git Repository
Once we have git installed on our machine creating a repository for version control is pretty simple. Let's start by creating a brand new test folder and asking git for its status.
mkdir testgit
cd testgit
git status
The previous call to git status will return something along the lines of "Not a git repository (or any of the parent directories)" which is OK since we haven't told git anything about this folder.
To put this folder under version control, or in git terms, to create a local repository, we can simply issue the git init command. This command will create several hidden folders and files inside our testgit folder. Git uses these folders and files to keep track of changes to files. If we issue git status now, we will see that git reports a status rather than an error like it did before we issued git init. The following screenshot shows the results of running these two commands on my machine:
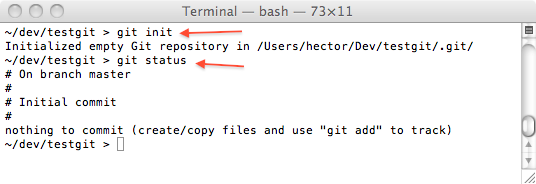
Notice how git reports that a branch called master has been created and that there is nothing to commit at this point. This folder is now officially under version control and everything that we do inside of it will be monitored by git.
Adding Files to a Git Repository
Let's start by saving a text file named file1.txt into this folder and asking git again for the status of the folder. This time git will report something like the screenshot below
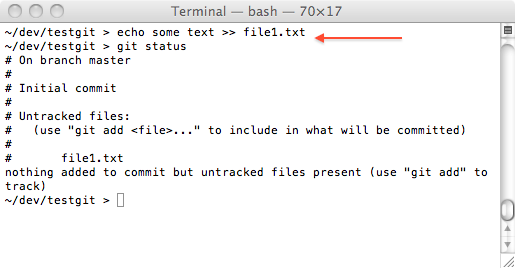
Notice that git is now reporting that the new file (file1.txt) exist in the folder but has not been added to the repository, or in other words, the file is not under version control yet.
Let's go ahead and issue the git add file1.txt command as suggested in the previous screenshot and then check the status of the repository again. The following screenshot shows what git reports now. Notice how git now reports that there is one new file to be committed.
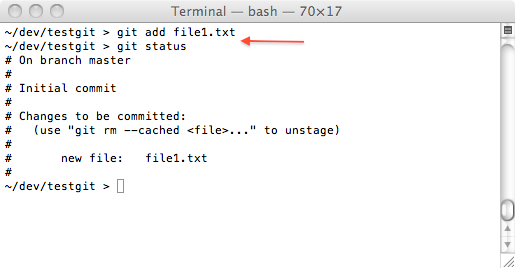
By adding a file we let git know that this file now needs to be tracked for version control but it's content hasn't been added to the repository. We need to issue another git command in order to actually commit the file to the repository.
Committing Files to a Git Repository
To commit to the repository new files or changes to existing files we simply need to issue a command like git commit -a -m "first file added". The following screenshot shows the result of committing this file and getting the status of the repository again.
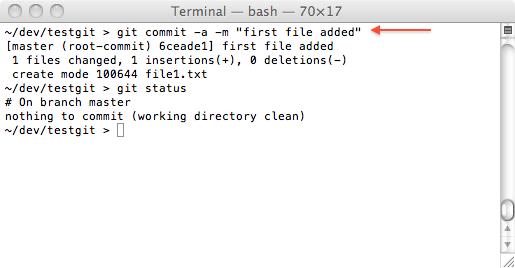
At this point we can add more files to the testgit folder, add them to the repository with git add and commit them with git commit and we are pretty much up and running with git.
Likewise, we can make changes to files already in the repository (e.g. to file1.txt) and commit them with git commit. We don't need to do anything special to be able to make changes to files already in the repository. We just edit the file and when we are ready we commit the changes. The following screenshot shows how an example of this.
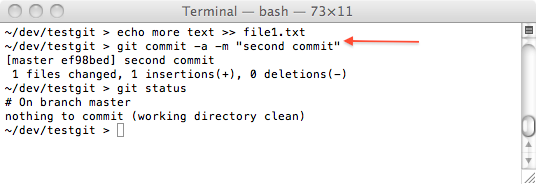
A note for Microsoft Visual Source Safe (VSS) and Team Foundation System (TFS) users: In git, the term commit is similar to the concept of checking in a file in VSS and TFS. However the term checkout in git refers to the process of switching to another branch which is totally different from the meaning of in VSS and TFS. Keep this in mind.
View History of Changes
Now that we have committed a few changes to our repository we can use several git commands to review what has changed, when each change took place, and who made each change. For example, the git log command gives us a list of commits that have been performed on the current branch. From there we can use the git show command to find out what commits affected a particular file or the git whatchanged command to review what were the specific changes made to a file on a particular commit. We can also use the git blame command to find out who made changes to a file (you've got to love a version control system that has a blame command.)
There are a lot of options that can be used with any of these commands and an entire blog post could be written about any one of them. The best place to get more information is probably the git docs web site. Below is a screenshot of what git log displays in our sample after a few commits.
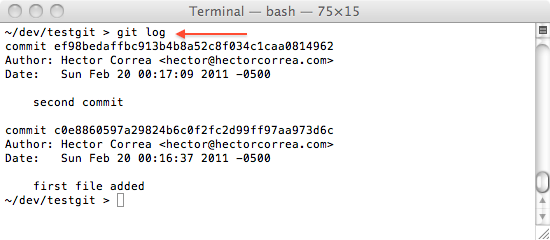
It's important to notice that aforementioned commands are command line tools and their results, although comprehensive, are not exactly easy to navigate or review since they are just plain text.
However, on the Mac OS X git comes with a graphic user interface to review the changes made to a particular branch. You can invoke this tool by issuing gitk on the terminal. Gitk displays the history of changes in a format that it's easier to navigate than plain text but in my opinion is still very rudimentary compared with what you can do in other version control systems like TFS. There are perhaps better tools out there that might be worth researching. Below is a screenshot of how gitk displays the history of changes in our repository. In this screenshot we can see that (1) on the second commit (2) file1.txt was changed and (3) the specific changes that were made to this file.
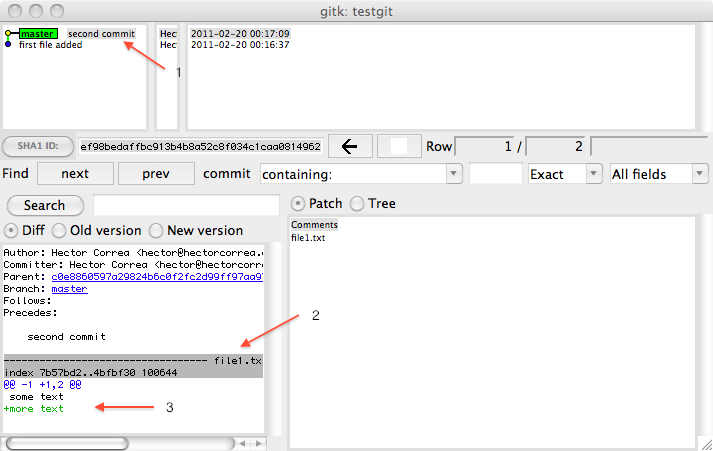
Using Branches
One of the biggest advantages of using a version control system for source code is that it allows you to make changes to your projects to test things out without having to worry about messing up a good working version of your system. By using branches you can create "sandboxes" from a good version of your source code, play on your sandbox until you are happy with your changes and then merge the changes back to the good version of your system...or you can also discard the sandbox altogether if you end up not being happy with the changes. As the git tutorial page says "branches are cheap and easy, so this is a good way to try something out."
When we first added a file to our repository git created a branch called master. You can see this by issuing the git branch command from the terminal.
If we want to create a new branch called "sandbox" from the current master branch we just need to issue git branch sandbox. This will create a new branch called "sandbox" with an exact copy of the code in the current master branch. After this if we issue the git branch command again we should see both branches listed as in the following screenshot. The asterisk next to the master branch means that we are currently on the master branch.

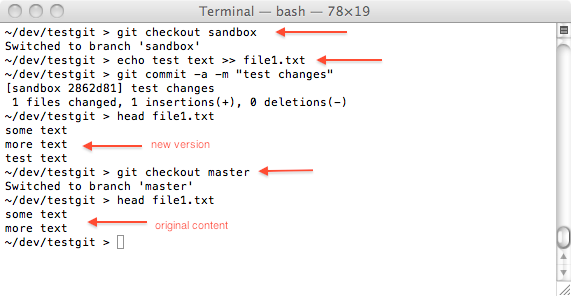
To switch to the sandbox branch we issue the git checkout sandbox command. If we issue the git branch again the asterisk will be next to the sandbox branch.
Any changes that we make to the files from this point forward will be localized to the sandbox branch until we switch back to the master branch. Let's say for example that we edit file1.txt and commit these changes using the regular git commit command. The following screenshot shows how the changes to file1.txt on the sandbox branch have been committed but the file still shows the original content on the master branch.
We can use the git merge command to merge the content of one branch with another. For example, let's assume that we are happy with the changes that we made on the sandbox branch and we want to bring them to the master branch. The following commands will merge the contents of the sandbox branch back into the master branch:
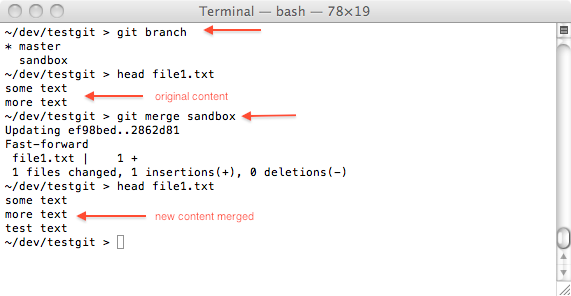
The merge command will automatically update on the master branch any files that were updated on the sandbox branch, it will also add any news files to the master branch that might have been added to the sandbox branch and delete any files that were deleted on the sandbox. You can use some additional arguments with the merge command to configure exactly what should be merged.
If the merge command detects that some of the files to be merged changed in both branches, git will do an automatic merge and ask you to verify the changes and perform a manual commit with git commit. Take a look at the git merge documentation for more details on this.
Summary
In this blog post we've seen how to get started with git. We went from creating a brand new repository, committing changes to it, reviewing the history of changes that we made, and created a separate branch to test changes before merging them back to the master branch.
As I mentioned at the beginning of this blog in a future post we'll explore how to use git to collaborate with others and work on remote repositories like GitGub.
References
There are plenty of good references to find more information about git, the basic commands that we've reviewed in this blog entry, and advanced git topics. Below is a selected list that I've found useful.
- This Git Tutorial is a great place to start. I learned a lot of what I posted on this blog in this tutorial.
- More comprehensive documentation can be found on Git User's Manual.
- The official git web site has also a ton of documentation that I've found useful.